Challenge
- Create a customized solution capable of grinding two mating metal components with a tight clearance between surfaces.
- Reduce the time and number of parts required for setup and in-process quality checks.
- Design a system to better measure the complex, high-tolerance shaver head, which is challenging to measure with conventional gauging systems.

Process
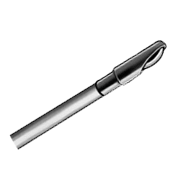
To grind the shaver body, two tubes are assembled with a minimal gap between them, sometimes as small as 0.0005″. This allows the inner tube to move freely within the outer tube while preventing debris from getting trapped between the surfaces. The tips of the tubes typically feature a rounded guiding surface, while the outer tube has a window cut into it to expose the sharp edges of the inner tube.
Using MMT’s Glebar GT‐610 CNC Centerless Grinder to infeed grind the shape of the inner tube, a +/‐ 0.0002” tolerance was maintained on the tip dimensions. In addition, three diameter features were ground to within 0.0002” per diameter, maintaining a TIR of 0.0001” and producing a smooth 9 Ra surface finish on 304V stainless steel with a +/‐0.001” wall thickness. A 0.012” in stock was removed from the tube and 0.004” from the tip geometry.
Ground parts were measured using the Glebar P4200 Gauging System during setup and in-process quality checks, utilizing a 2D micrometer to capture a reading every thousandth of an inch around the tip of the shaver. This feedback is automatically sent to the GT-610 CNC, which adjusts the dressing profile accordingly, reducing the time and number of parts required for setup and in-process quality checks.
Solution
MMT’s Glebar GT-610 CNC Centerless Grinder and P4200 Gauging System were utilized to:
- Capture a full image of the shaver head geometry utilizing the P4200’s 2D micrometer, combined with a linear encoder, stitching together an increased number of data points.
- Create adjusted dressing profiles utilizing feedback from the P4200, which were sent to the GT-610 CNC.
- Provide a minimum gap between assembled parts to prevent debris from catching amidst the two surfaces while maintaining a +/‐0.0002” tolerance on tip dimensions.
Results
- The updated, fully automated process is now completed in less than 20 seconds, which adjusts for part length variation, heat expansion, and a near-zero tolerance tip geometry.
- MMT provided multiple efficiencies within various stages of the manufacturing process. For the outer sleeve, the GT‐610 Thrufeed Grinder was used to grind the OD of the blank tubes, maintaining a surface finish between 3‐6 RMS and a comfortable 2‐3 Cpk on the outside part diameter. Material removal of 0.005” with a tolerance requirement of +/‐ 0.0005″ was easily achieved.
- For the inner, tighter tolerance shaver, the GT-610-CNC was required to shape the complex form of the shaver head, holding near-zero tolerances while maintaining a surface finish between 3‐6 RMS and a comfortable 2‐3 Cpk. This was possible using the patented feedback process from the customized P4200 Gauging System.
- These turnkey solutions vastly reduced scrap rates and setup times for extremely complex processes.
Medical Manufacturing Technologies (MMT) is a vertically integrated business serving the medical device manufacturing industry and beyond. The company offers process development, applications and equipment, technical solutions, and aftermarket support. MMT brands include Cathtip, Comco, Engineering By Design, FEPeeler, GenX Medical, Glebar, Interface Catheter Solutions, MMT Automation, MPT Europe, R&D Engineering, SYNEO, Somex Automation, and Tridex Technologies.
